Everything About Junk Journals
What's A Junk Journal
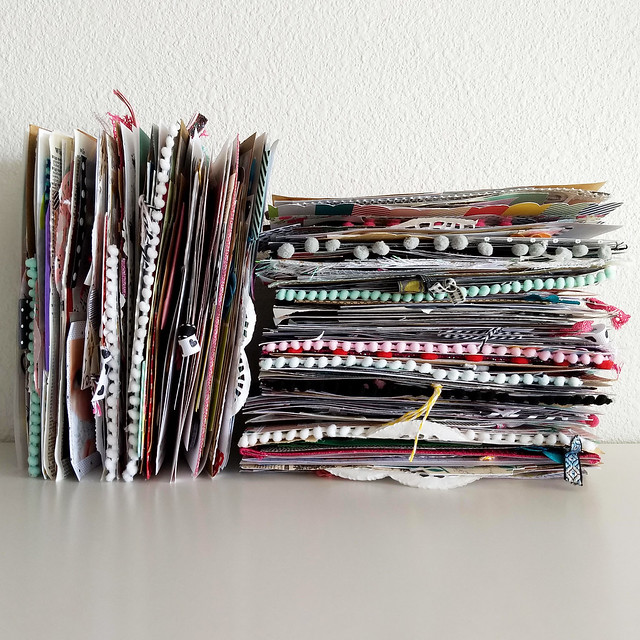
A junk journal is basically a journal that is made with a variety of papers and other materials, often things that many people would consider junk, like used envelopes, packaging and other recyclables that you find interesting. I love using my junk journal because it takes away the fear of the blank page, because you're rarely looking at an empty white page when starting. A lot of the work is done in the initial binding, so when it comes time to fill it you don't have to think too hard. This worked especially well for me when I was trying to get back into the craft room after having my son Magnus. Since it's called a junk journal, you don't have to take yourself too seriously when working in it: just kind of stick stuff in as you feel like it. And then magically it all comes together as a fun and interesting hodge-podge.
Making the actual journal may seem a bit intimidating, but is actually pretty simple and requires very few tools. In fact, the only thing you need is something that can poke a hole through a bunch of papers. I literally went to the hardware store and asked for something that would poke holes and eventually found something. You can also order an awl from Amazon if you don't want to seem like a weirdo at the hardware store. Aside from your poky tool, you just need the papers you want to include, some embroidery thread and a large needle. I have a video here that walks through the process of stitching the binding.
Some people like to combine several of the hand-stitched journals together (a single stitched collection is called a signature) into a book. I always make my signatures too full, so I just use them on their own as a notebook. Lately I've preferred to add a sturdy cover when stitching, usually a plastic folder cut to size. I also like to add a string binding so that I can close the notebook. You can make your journal any size. I usually make mine traveler's notebook sized (about 4.5x8.5 inches) and I also enjoy using a mini one (3.5x5.5 inches).
Junk Journal Process Videos

Instagram Gallery

Finished Notebooks
Baby Junk Journal #1
Blog Post
Flip Through Video
Image Gallery
Baby Junk Journal #2
Blog Post
Flip Through Video
Image Gallery
Baby Junk Journal #3
Blog Post
Flip Through Video
Image Gallery
Baby Junk Journal #4
Blog Post
Flip Through Video
Image Gallery
Baby Junk Journal #5
Blog Post
Flip Through Video
Image Gallery
Baby Junk Journal #6
Blog Post
Flip Through Video
Image Gallery
Baby Junk Journal #7
Blog Post
Flip Through Video
Image Gallery
Baby Junk Journal #8
Blog Post
Flip Through Video
Image Gallery
Supplies
You can check out my Amazon store where I have the few items that I use listed. I keep a pretty minimal craft room and I print out the majority of my papers on my home printer. A lot of my elements stash comes from the dollar store.

Questions?
If you have any questions please ask below in the comments and I'll do my best to answer.
Video Transcript
Hi there! Today I am going to show you how I stitch my junk journals. So I have here a collection of papers that I already got together, because this takes a little bit of time to get all the papers that you have, that you want to include. So I've already done that.
So I'm going to go ahead here and look through what I've got. This one kind of has a pink theme. I think I'm going to use this. Let's see, I have one of these. They're both scrapbook papers...trying to decide which one to use as the cover. I think I might use this one as the cover, because this one has— I printed on the inside.
So I'm going to use this one as the outside layer. Or the cover, basically, and then I'm just going to start including in some of these papers here. And so I'm just going to stack them in so that they are inside of each other. And then if it matters to you which way is up then you can— yeah— sorry I was thinking there. Just make sure that they are facing the direction that you want to have them.
All right, so I'm gonna put this here. Then I have— this is a paper that I cut ahead of time on my silhouette, so it is ready to go. Let's see here, what should we put in next? This pink one. Put in this doily. I can't put that here, I think I'm gonna put this pocket in the middle. Maybe? And this black and white paper— I think I'm going to put— I think I'm going to go back and put this here.
Okay, okay, so I've got my papers all stacked together. Now I just want to make sure that they are all centered. Let's make sure— I'm lining everything up I think, to the bottom here. Push everything down. Just have a little look. I like making junk journals because they are called junk journals, and so that means that you know things do not have to be super— you know— exactly right.
So I've got these here, and now I'm just— I want to make sure that the middle here is lined up because I'm going to poke a hole straight through the fold...there. So I want to make sure things are nice and tight. I have some clips here. I'm just gonna secure my things here, and then make sure these are here. I don't know if this clip is gonna get me quite— I'm gonna get another, bigger clip.
Okay just make sure these are tight in there. Alright, alright. So I probably will come back and trim, I'm gonna trim these edges here. And then, you know what? I was going to put in— I forgot one layer I was going to put in. This paper, this plastic bag so…
All right, so now I've got my spine together. So now I'm going to poke my hole, so I have this pokey thing that I bought at the hardware store. If you're looking online for something you want— it's called an owl: AWL. It just, you know, makes a hole basically. But this I bought at the hardware store. I just asked them for something that could make a hole like this. So I don't exactly know what this device is called.
So I'm gonna go ahead here, and you can measure if you want to, but I think I'm gonna just make my hole here, so that this pocket is included. I'm just gonna poke, kind of fold this like this so. As I poke until...there you go. So you can see that the poke has come through. And then we want one about in the middle. Although, I think because of this pocket, I might just poke down a bit lower here. So that that pocket flap is included.
Now you can see the poke has come through again, and then one more here at the bottom. Okay, so that is pretty easy and now I'm just going to pull out my, what color thread this is, pink, here. So maybe I'll use this pink thread then. I'm sorry, I think I forgot my bigger needle. No, maybe I have one up here. Okay, so this is an embroidery needle. It just has a bigger eye on the top, because I want to— I'm going to put through a whole length of thread here.
So I'm not really sure how long we need to make this. We're going to go through the spine basically twice, so this is long enough I think. Okay, so there's no need to knot the end. I'm gonna go ahead and thread this needle. Okay, so then basically you want to start at either the top or the bottom hole, from the inside. And you want to leave some thread on the inside, because we're going to come back and we're going to knot using this thread. So you want to have a little there, so that you can do that, and then we want to come through the middle.
I can feel my needle is getting stuck somewhere. There we go. Okay, and then we're going to come through the top hole and snap. And then back through the middle. There we go! So pull this through. Take the needle off, and now it's as easy as tying a knot here with your two ends. And you can leave these long, or you can trim them. I'll just leave them for now.
And there you go! It's all finished. This is called a signature. So if you hear people— if they're binding books, they will talk about making a signature. Which is what this is. So you could put several of these together and bind them together, you know, in a book cover, and that's how you make a book.
But I often will just use it as is, just like this. I hope that was helpful. If you have any questions, please leave them below in the comments. And if you liked this video, please give me a thumbs up. And if you would like to see more like this, please subscribe to my channel.
Thanks a lot!
Have a great day!
Blog By

Subscribe to this blog
![]()
![]()
My Projects

Follow Marisa Lerin
Monthly archive
- November 2012 (9)
- December 2012 (37)
- January 2013 (17)
- February 2013 (13)
- March 2013 (20)
- April 2013 (26)
- May 2013 (29)
- June 2013 (9)
- July 2013 (8)
- August 2013 (13)
- September 2013 (16)
- October 2013 (14)
- November 2013 (16)
- December 2013 (12)
- January 2014 (15)
- February 2014 (9)
- March 2014 (15)
- April 2014 (11)
- May 2014 (4)
- June 2014 (9)
- July 2014 (8)
- August 2014 (7)
- September 2014 (8)
- October 2014 (13)
- November 2014 (6)
- December 2014 (3)
- January 2015 (13)
- February 2015 (14)
- March 2015 (14)
- April 2015 (13)
- May 2015 (12)
- June 2015 (11)
- July 2015 (10)
- August 2015 (8)
- September 2015 (7)
- October 2015 (10)
- November 2015 (8)
- December 2015 (10)
- January 2016 (7)
- February 2016 (6)
- March 2016 (8)
- April 2016 (7)
- May 2016 (8)
- June 2016 (8)
- July 2016 (6)
- August 2016 (5)
- September 2016 (8)
- October 2016 (8)
- November 2016 (11)
- December 2016 (7)
- January 2017 (6)
- February 2017 (12)
- March 2017 (10)
- April 2017 (7)
- May 2017 (9)
- June 2017 (9)
- July 2017 (10)
- August 2017 (7)
- September 2017 (11)
- October 2017 (8)
- November 2017 (9)
- December 2017 (8)
- January 2018 (8)
- February 2018 (8)
- March 2018 (8)
- April 2018 (4)
- May 2018 (9)
- June 2018 (9)
- July 2018 (4)
- August 2018 (5)
- September 2018 (13)
- October 2018 (19)
- November 2018 (18)
- December 2018 (14)
- January 2019 (23)
- February 2019 (20)
- March 2019 (17)
- April 2019 (14)
- May 2019 (17)
- June 2019 (14)
- July 2019 (8)
- August 2019 (3)
- September 2019 (14)
- October 2019 (17)
- November 2019 (16)
- December 2019 (6)
- January 2020 (14)
- February 2020 (20)
- March 2020 (16)
- April 2020 (18)
- May 2020 (19)
- June 2020 (16)
- July 2020 (8)
- August 2020 (5)
- September 2020 (8)
- October 2020 (10)
- November 2020 (10)
- December 2020 (7)
- January 2021 (4)
- February 2021 (9)
- March 2021 (8)
- April 2021 (7)
- May 2021 (7)
- June 2021 (7)
- July 2021 (10)
- August 2021 (7)
- September 2021 (8)
- October 2021 (5)
- November 2021 (7)
- December 2021 (6)
- January 2022 (5)
- February 2022 (7)
- March 2022 (9)
- April 2022 (6)
- May 2022 (7)
- June 2022 (4)
- July 2022 (2)
- August 2022 (1)
- September 2022 (3)
- October 2022 (6)
- November 2022 (4)
- December 2022 (6)
- January 2023 (4)
- February 2023 (5)
- March 2023 (6)
- April 2023 (5)
- May 2023 (5)
- June 2023 (5)
- July 2023 (5)
- August 2023 (5)
- September 2023 (5)
- October 2023 (4)
- November 2023 (4)
- December 2023 (5)
- January 2024 (4)
- February 2024 (5)
- March 2024 (5)
- April 2024 (2)
Recent Comments
I'd just put in envelopes and then you can add as much writing as you want by tucking it inside. You can either include the envelopes when you're making the journal, or glue them in on a page.
So I am trying to make a sort of time capsule type book for my son who is eight. I wanted to do it like a junk journal, but the ones I see in the tutorials on Youtube or on blogs (or etsy) where you can get the papers and kits don't really show much, if any writing at all. Do you have any suggestions for ways to add notes and such that won't mess up the "junk journally" vibe?
@Marisa, okay. I'm still researching it here. I was at my mom's yesterday and my dad almost went a tad crazy because he was looking for a photo and when he opened Google photos HIS pics were gone like mine were in my question comment. I just want to back them up and print them off to put in an acid free book or something. Going to collect pretties now!
@Elizabeth: I use Google Photos for backup.
Question!!!! You have GOT to have a couple hundred TONS of pictures. I am trying to figure out the best way to store an OFFLINE in my hands if I need it to be way to store my son's pictures. There are only a couple ... million! (No, seriously, I have a ton.) Goggle photo scared me half to death when I thought all my stuff had been erased. Please tell me you some form of hdd or ssd or flash drive with HI capacity and LOW failure rate that you would suggest.
JJ are my jam! I collect large old beat up books and rip em up for new books all the time! There's tons of different things you can do with them, and always new videos out on youtube with new techniques and ideas for ephemera. I am a very recent new member here, but my very next JJ thing is going to be to feed some of my less fragile book pages through my printer (attached to a sheet of copy paper with washi tape or weak cellophane) and printing background papers on it. I think it's going to be beautiful!
thanks for the tut on making signatures! i've always just purchased them in the past. so much more simpler than i imagined it would be.
I love JJ's. I love the fact that I can reuse so much of the paper from my husband's office. I love how digitalscrapbook.coms makes this so much easier because I can take all the wonderful patterned paper images and other images and print them on the clean side of the paper. Then I can use all the heavy weight junk mail I get to make tags and journaling cards. I also like to reuse all the envelopes I get. I never thought of filling the signatures before sewing them into the cover. I may have to try that, although I would need to have a cover in mind so I would know what size to make the signatures because my covers are not usually TN size. Thanks for giving me something else to consider, Marisa!
Oh wowowowowow! Thank you for this process video! I just learned something new and different. How fun to come back into scrapping after so long to discover such creative ideas. I'm going to make a Junk Journal as soon as I can. I LOVE that you showed how to use different sized papers, types of papers, and materials to make it very eclectic and creative. I feel my creative juices starting to flow. :-)
Love them!I love making Junk Journals. Such an eclectic design and feel. Thanks for sharing yours!