
Having a shape appear cutout is a great way to add dimension and interest to a layout. And in Photoshop it's super easy! You just need to apply the right layer style.
First on my Photoshop canvas I have opened two papers. I've hidden the one on top for now, and in between these two paper layers I'm going to make a new layer. On this new layer I'm going to make a circle using the custom shape tool.

Next, I've turned the hidden paper layer back on and I'm going to clip it to the circle by right clicking on the paper and choosing "create clipping mask."

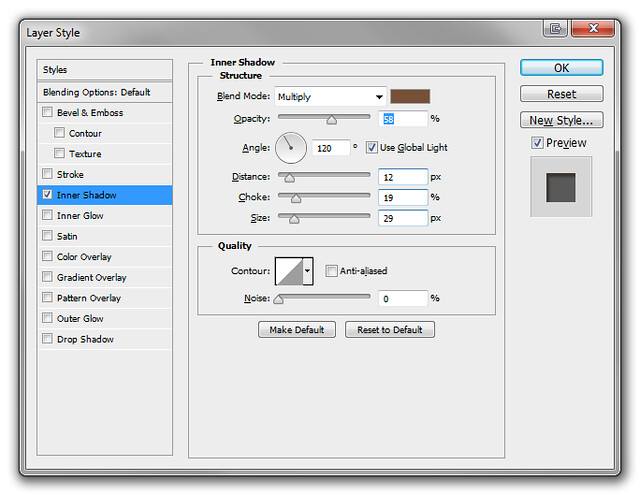
Now, it's time to apply the style. Double click on the circle layer and apply the following (you can of course change up the values for a different look). The key here is that we are using an "inner shadow" rather than a "drop shadow."
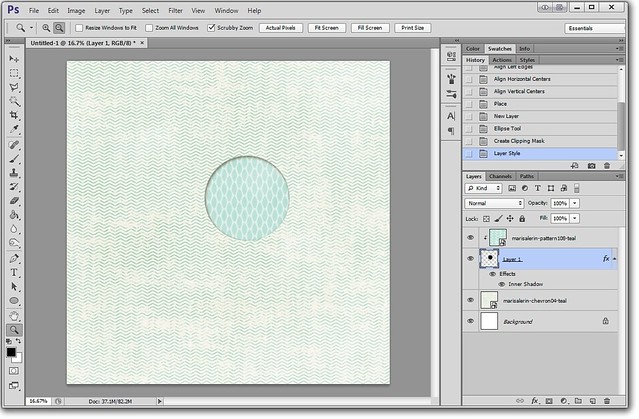
Finally, your circle will now look like it's been cut out of the paper on the bottom even though it's on the top!
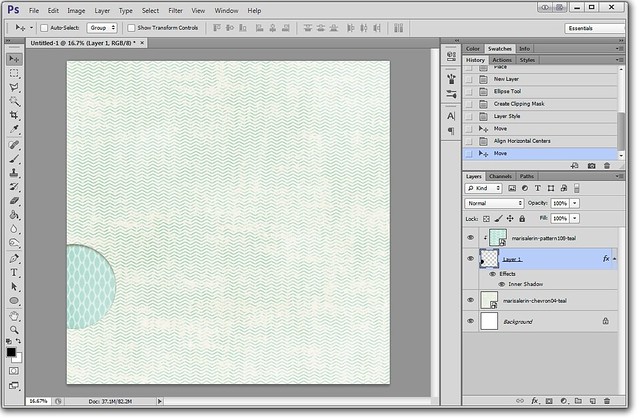
It's super easy to readjust the look of your page by moving the circle wherever you'd like it to be.
Thanks Marisa..this was a fun tutorial!
This is soo cool. I hope to try it out soon.
Thanks Marisa! I think with all your tutorials I should have no problem in learning PS CS6!
I love this effect but I use gimp and can't seem to figure out how to accomplish this. Gimp does not have the clipping mask and it sure would make my life easier if it did! Does anyone know how to do this in gimp? Thank you.
In GIMP you will add a layer so you will have your background, then layer 1. Select the circle or rectangle cutout for your desired shape, then delete that out. With your selection highlighted go to Filters -->Lights and Shadows and select drop shadow.You will need to play with your offsets, but they will both need to be negative for an inner shadow.
Emily, thank you so much! I really appreciate your response.I do have an inner shadow filter but it gives me an error message when I try to apply it. I can't wait to try this. I wish work didn't always get in the way of the fun stuff!!!
I've been trying to make a realistic cut out for ages and I was doing everything just like you, except I was using the drop shadow - duh! It seems so logical now, I can't imagine why I never thought of doing it that way. Thanks so much, I'll definitely remember this
Thanks, I love this effect.
I love this method! Much better than how I was doing this since you can move the cut-out around. Thanks so much!
PS I tried adding a photo to my profile but it would not accept it. I tried 100 and 200 px sizes. What is the best size?
Thanks for this tutorial. I love this effect.
So easy! Thanks Marisa!
It makes so much sense and seems so simple after following these steps! Thanks Marisa!
Thank you so much for this tutorial! I've always wanted to know how to do this.
Thanks for the great tutorial Marisa!
i've been obsessed with these cutout shapes trending lately, thanks so much for sharing how to make our own!!!
Inspired by our cutout challenge, I just wrote a blog post (scratch that - I just created a blog so I could write a blog post! ) about a different technique that I use to make cutouts that has more flexibility in terms of what you can have showing through beneath the cutout. I also made the Photoshop actions I use to do it available to download. http://eversoscrumptiously.wordpress.com/2013/01/18/its-a-knockout/ I'd love to know what you think, Marisa, and anyone else as well!
Very easy to follow. Thanks.
I finally had the time to play with this tut and it worked. Here again, I really thought this was something which would be hard to accomplish but lo and behold it was so-oooooo easy. Thank you for simplifying my life one tut at a time. LOL ...
@Violet - that "knock out" technique sounds cool! I
I  how multi-functional it is! Is there any way you could describe how to do that? (maybe make up a tutorial on that?) I don't have Photoshop (I use PSP), so downloading the actions you made isn't a possibility for me...
@Lizanne, the tricky part is that the tutorial I followed is very specific to photoshop and relies on a specific photoshop layer effect. I don't know how easy it is to translate tutorials written for photoshop into something you can use, but if you want to check it out, the link to the tutorial is in the blog post with the actions, near the bottom of the post: http://eversoscrumptiously.wordpress.com/2013/01/18/its-a-knockout/
Thanks, Violet... Looked it over & not sure I could translate the 'Photoshop-speak' to PSP...
Maybe I can do a search on Ixquick to see if there's anything on 'knockouts' for PSP?
Edited to add:
Just did a quick lookie & this is what I came up with for knockouts in PSP: This masking process allows the user to remove an object from an image while retaining the details of that image. Knockout 2 specializes in allowing users to retain minute details such as hair, smoke and light effects while moving objects from one image to another.
Guess I need to find another synonym for this process of cutting through the various layers to create a "knockout" look? Anyone have any ideas so I can do another search?
I am using an older version of photoshop and can't make this work. Will keep trying.
This technique looks so easy when you teach it. I had made "holes" in paper by cutting and sliding images and new pages etc. I love your simplicity! xoxox Beth
Thanks for sharing this technique. Going to practice making holes today!
Excellent tutorial, Marisa.... and thank you so much for the knockout action, Violet! I can't wait to try the methods by you both. I'm thinking of using it to "knock out" my watermark name on my photos.
Thanks for the tutorial...I think I have tried doing this a different, way more complicated way!
I'm so excited to finish off this layout...love technique challenges.
Wow, who knew it was so easy?! Thanks, Marisa! And thanks for the action, Violet! Anyone know if it works in PSE? I'll have to load it & find out for myself sometime this week.
*edited to add: Unfortunately, it doesn't seem to like PSE. Thems the breaks. Oh, well!
Wow ... thank you! I had no idea that you could do this with photoshop
So glad you are finding it helpful! It's very exciting for me to share it because it's something I had to hunt really hard to figure out so I want to spread the word about it to as many people as possible.
@Elaine: I made the action in PSCS so I know it works all the way back in CS and CS2. What version of Photoshop are you using? Perhaps the knockout effect was a new feature in CS?
Pages